
Static Website over https with S3, CloudFront, Gatsby and Continuous Delivery
November 05, 2018At Appfocused our aim is to build enterprise grade solutions with minimal financial risk and choosing technology path of least resistance. A perfect showcase of applied simplicity and reliability at a low cost is the architecture of our very own website and blog.
In this post I’d like to share how Github / Travis and AWS suite of services helped us to host our static website, setup domain and SSL/TLS certificates and automate deployments.
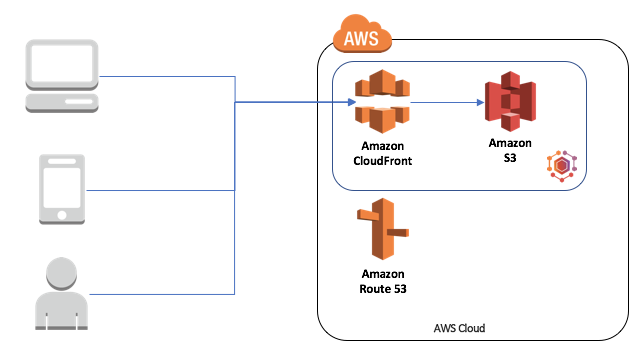
Architecture
- Website content is generated and uploaded to S3 bucket
- CloudFront invalidates previous cache and caches the new contents of S3 bucket
- User requests
www.appfocused.com - AWS Route 53 A record matches this request and points to the linked CloudFront distribution
- Cloudfront distribution enables secure connection and serves cached version of S3 bucket’s content
Tech choices
- Static website generator: Gatsby
- Hosting: AWS S3
- Domain management: AWS Route 53
- TLS certificate: AWS Certificate Manager
- CDN: AWS Cloudfront
- Code repository: Github
- Continuous Deployment: Travis
Process
The baseline for the website ops looked as following:
- Generate the website
- Securely serve the website on https://www.appfocused.com
- Redirect all
appfocused.comrequests towww.appfocused.com - Redirect all
httprequests tohttps - Automatically build and deploy the website when a change is introduced
- Invalidate CDN cache on deployment
Let’s go through it step by step and talk about tech decisions and setup.
1. Generate the site
First things first, I had to generate the website. Out site uses Gatsby v2 — modern site generator for React. Since React paradigm has been introduced in 2013 it’s hard to think of a better way for web apps and web pages to compose components and encapsulate styles with CSS Modules. Once it’s set up, you need to run gatsby build and it will perform an optimized production build for your site generating static HTML and per-route JavaScript code bundles.
Check out our website’s source code on github for inspiration.
2. Host the site
Once I had the website content generated, I desperately needed to show it to everyone, and the easiest way to do it was to make it accessible on the Internet.
I used AWS S3 for this purpose. The service is dirt cheap, you don’t need to run servers on AWS EC2 instance, maintain it and check logs and most importantly pay for the uptime. All you do is you create buckets (think, folders) and upload your generated website content there. Finally, S3 bucket was configured to serve files as a static website.
To support both naked appfocused.com and www.appfocused.com I needed to create two S3 buckets with respective domain names. In our case www.appfocused.com bucket held all the static files for the website and appfocused.com bucket was empty and it was configured to redirect requests from appfocused.com to URL www.appfocused.com with https protocol.
I’m not going to discuss the setup at length as AWS has finally caught up on documentation and now has extensive docs on almost anyhting that you can think of. Here’s a good document on how to set up a basic static site with custom domain. The devil is always in the details though and I will touch on these later on.
One key point to remember for now is that AWS S3 buckets used as Website Endpoints (e.g. http://appfocused.s3-website.eu-west-1.amazonaws.com) do not support secure connections. That is one of the reasons I add AWS Cloudfront layer to the architecture, so that I can proxy secure requests to our static website in the bucket. I’ll tell you how to set it up in one of the next steps.
3. Register a domain
Our files are now hosted and can be viewed by our users through S3 bucket’s URL. Next step is to add more presentable and professional domain name — appfocused.com.
I tend to choose a domain registrar carefully. It’s not only about squatting a shiny domain name, but also thinking about ongoing domain management that you will be getting from the registrar.
Domain management directly affects server downtime, DNS configuration changes, software patches and numerous other tasks that pose serious challenges for IT organizations.
AWS Route 53 wins almost on all fronts for me: low cost, fast DNS updates, wildcard for subdomains (some providers block that capability), good integration with the rest of AWS (obviously).
4. Generate an SSL/TLS Certificate
Secure-by-default is a great mindset to have, and while many of our users may never notice, the ones who do will appreciate it. Another group of SSL/TLS cert fans is search engine crawlers. You can rest assured that your site will be penalised on SERP without a valid TLS certificate. Surely, I wanted to avoid the penalty.
With AWS Certificate Manager, I requested an SSL/TLS certificate for free. Add both naked domain and its www version to the new certificate (one cert that contains main domain, sub-domain and wild-cards).
One improtant thing to note: I had to change the AWS region to US East (N. Virginia) in the AWS Certificate Manager console before requesting or importing a certificate.
5. Create Cloudfront Distributions
There are two vital reasons to use Cloudfront in our solution:
- Security at the edge
SSL/TLS certificate provides network level protection. - Fast and Global
website is served with improved latency and has lower load on the origin servers (S3 buckets in our case).
Setup steps and some caveats
- I created two CloudFront Distributions. Each of this distributions point to corresponding bucket: one to
appfocused.com, another one towww.appfocused.com - For Origin Domain Name I did not use AWS autosuggest in the dropdown (counterintuitive, I know). Instead, you are expected to manually enter bucket urls provided in Static Website Hosting section (Website endpoint). The urls should have form (or similar):
appfocused.com.s3-website-us-west-1.amazonaws.com - On both distribution I set HTTP to HTTPS redirect
- I left Default Root Object empty
- I added our TLS certificate to Custom SSL Certificate field
Once the distributions has been created I made a note of both distribution URLs (similar to d1111111111111.cloudfront.net), they would play key role in the next step.
6. Configure your domain to work with Cloudfront
With two Cloudfront distributions set up and deployed successfully, I went to Route 53 to configure my domain DNS. I set A records for www.appfocused.com and appfocused.com to point to corresponding CloudFront distributions. (format similar to this: d1111111111111.cloudfront.net).
Now our website is served only via https protocol: http traffic as well as appfocused.com traffic is redirected to https://www.appfocused.com. Perfect for SEO, as there are no mirrors (duplicate sites) created.
7. Setup continuous delivery with Github and Travis CI
The website code is hosted on github as open source, we’ve got nothing to hide.
Every commit to master branch triggers a build and deployment to AWS S3. The honours are done by Travis CI. In order for it to work, I had to authorise it to access appfocused repository.
Then I added environment variables to Travis CI:
$AWS_ACCESS_KEY_ID$AWS_SECRET_ACCESS_KEY$S3_APPFOCUSED_BUCKET$CLOUDFRONT_DISTRIBUTION_ID
These variables are only accessible only to the build script, no one is able to access them.
Such separation and encapsulation of the source code and environment config helps us to freely share our code without a fear of being hacked.
Once environment vars has been configured in Travis, I added a config file inside my project’s root on Github — .travis.yml. It is a step-by-step instruction for Travis CI and it makes continuous integration and deployment possible by doing the following:
- installs AWS command line
- installs npm dependencies
- runs unit tests
- builds the project
- authenticates with AWS
- removes the contents of S3 bucket (previous release)
- deploys the new build to S3
- invalidates cache on CloudFront distributions for new content to appear on users screens
All of the above allows me to go to Github’s web UI from the browser, add a folder and a markdown file inside src/data/blog. Once I’m done editing my mardown file, I’m able to save it and commit it to master branch using the same web interface in the browser. The new blog post will be available in a matter of seconds.
Cost
Last but not least — cost of ownership.
Annual maintenance cost for appfocused.com:
- domain price - $12
- S3 / Cloudfront - $40
- Gatsby / Github / Travis - free (subject to open source)
Total: $52 per year